Beginner
Claude Code Deep Configuration Guide: 90% of People Don't Know How to Use It
Claude Code Deep Configuration Guide: 90% of People Don't Know How to Use It
Whether Claude Code listens to you depends entirely on whether you've opened this hidden
.claude folder.The
.claude folder is Claude's control center. It governs how Claude understands instructions, which commands it can run, what permissions it has, and what it can remember. Once you understand it, you can make Claude Code work by your rules.Recently, Akshay Pachaar shared a comprehensive guide that thoroughly breaks down the structure of the
.claude folder. Based on his sharing, I've compiled this article, covering everything from basic usage to advanced configuration.What is the .claude Folder For?#
The
.claude folder is where you tell Claude how to work.You can write rules inside it, such as "write tests before writing code," "don't use a certain command," or "remember my coding habits." After you write them, Claude will follow them every time it works.
There's a common point of confusion here: there are actually two
.claude folders.One is inside your project, and one is in your user directory:
The project-level folder holds team configurations. You commit it to git, and everyone on the team uses the same rules, custom commands, and permission policies.
The global
~/.claude/ folder holds your personal preferences and local state, such as session history and auto-memory.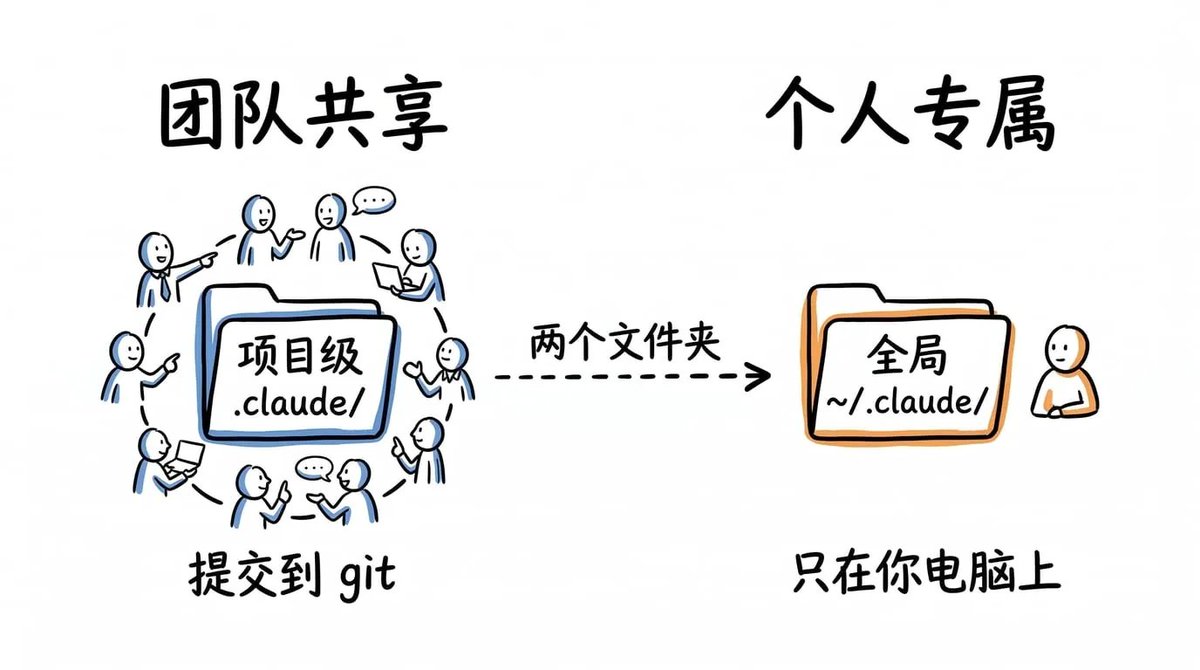
CLAUDE.md: Claude's Instruction Manual#
CLAUDE.md can be understood as the "instruction manual for Claude."Every time you start Claude Code, the first thing it does is open this file, memorize its contents, and follow them throughout the entire conversation.
Simply put: whatever rules you write in
CLAUDE.md, Claude follows.For example, if you write "write tests before writing code," it will write tests first. If you write "don't use
console.log, use our custom logger instead," it will remember every time.This File Can Be Placed in Three Locations:#
-
In your project folder (most common) Place it in your project's root directory, like your website project folder. This way, whenever anyone on the team opens this project, Claude will follow the same rules.
-
In your computer's user folder (
~/.claude/CLAUDE.md) This is your personal setting. It takes effect no matter which project you open. For example, if you like "writing more comments in code," writing it here ensures Claude remembers it across all projects. -
In a subfolder within your project For instance, if your project has an
apifolder, you can set specific rules just for that folder.
Claude reads all three files and combines them.
What to Write in CLAUDE.md#
Recommended Content:#
-
Common Commands Like how to start the project or run tests. Examples:
npm run test(run tests),npm run dev(start project). -
Technologies Used in the Project Like "we use React for the frontend" or "the database is PostgreSQL."
-
Common Pitfalls Like "this project cannot use
var, onlyletandconst" or "must run tests before committing code." -
Coding Conventions Like "use lowercase for all filenames," "use try-catch for error handling," or "imports must be at the top of the file."
-
Folder Structure Like "all components go in the
componentsfolder" or "utility functions go in theutilsfolder."
What NOT to Write:#
-
Code Formatting Rules Like "use 2 or 4 spaces for indentation" or "whether to use semicolons." These should be managed by tools like Prettier or ESLint, not written here.
-
Content Already in Detailed Documentation If your project already has comprehensive development docs, just write "see
docs/guide.mdfor detailed specifications" inCLAUDE.md. Don't copy the entire document. -
Long Theoretical Explanations Don't write tutorials like "what is React" or "why use TypeScript." Claude already knows these things. You only need to tell it "our project uses React."
Remember:
CLAUDE.md should ideally not exceed 200 lines.If the file is too long, Claude has to spend significant effort memorizing it, which can reduce its work efficiency. Keep it short, direct, and practical.
Here's a concise but effective example:
# Project Guide

## Tech Stack

- Next.js 14 (App Router)
- TypeScript (strict mode)
- Tailwind CSS
- Prisma ORM

## Commands

- `npm run dev` - Start development server
- `npm run test` - Run tests
- `npm run lint` - Lint code

## Rules

- All components use functional style, no classes
- API routes go in `app/api/`
- Database operations go through `lib/db.ts`
- Error handling uses utility functions from `lib/errors.ts`

## File Structure

app/ - Next.js pages and routes
components/ - Reusable components
lib/ - Utility functions and config
prisma/ - Database schema
About 20 lines is enough. Claude knows everything it needs and won't have to ask you repeatedly.
CLAUDE.local.md#
You might have some personal writing preferences that you don't need the team to enforce.
For example, you prefer using Vitest for testing, but the team uses Jest. Or you want Claude to "add more comments when writing code for me," but your colleagues don't need that.
In this case, create a
CLAUDE.local.md file in your project folder.Claude will read it alongside
CLAUDE.md, but this file won't be committed to the git repository. So your personal preferences remain yours alone and don't affect others.My Personal Preferences#
- Use Vitest for testing instead of Jest
- Component files always include PropTypes
- Commit messages in Chinese
The rules/ Folder: What to Do When There Are Too Many Rules?#
Your
CLAUDE.md file starts with a concise 20 lines.But after six months, the team keeps adding new rules, and the file becomes 300 lines. It's too long, and no one wants to read it.
The Solution:#
Split those 300 lines into several smaller files, like:
api-conventions.md(rules for writing APIs)testing.md(rules for testing)security.md(rules for security)
Place all these files in the
.claude/rules/ folder.Claude will automatically read all these smaller files, achieving the same effect as one large file, but it's much easier to manage.
For example, separate rules by category:
.claude/rules/
  ├── api-conventions.md
  ├── testing.md
  ├── security.md
  └── ui-patterns.md
Each file stays focused and easy to update. Team members responsible for API conventions edit
api-conventions.md, those responsible for testing standards edit testing.md.There's also a more advanced feature:
You can make a rule file only apply within a specific folder.
For example, you write an
api-rules.md file containing API rules. Add these lines at the top of the file:---
paths:
- "src/api/**"
---This way, Claude only reads this rule file when modifying code in the
src/api/ folder. It won't read it when modifying code elsewhere.What's the benefit?
For instance, your API code requires "must return JSON format," but frontend components don't need this rule.
If you write this rule in
CLAUDE.md, Claude will remember it even when modifying frontend code.Now, by writing it separately in
api-rules.md and specifying it only applies to the src/api/ folder, Claude won't be distracted by this rule when modifying frontend code.---
paths:
- "src/api/**"
- "src/handlers/**"
---
# API Development Standards
All API endpoints must:
- Return a unified JSON format
- Include error handling
- Log requestsThe commands/ Folder: Claude Shortcuts#
You can create custom shortcut commands so Claude can complete a task with one click.
For example, you often ask Claude to "review my code," which requires typing a lot each time. Now you can create a
/review command, and just type /review in the future.How To Do It:#
Create a markdown file in the
.claude/commands/ folder.The filename is the command name.
- Create
review.mdyou get the/project: reviewcommand - Create
fix-bug.mdyou get the/project: fix-bugcommand
For example, create a file
.claude/commands/review.md with the following content:# Code Review
Review recent code changes:
!`git diff main...HEAD`
Focus on:
- Code style consistency
- Potential performance issues
- Security vulnerabilities
- Test coverageNow, when you type
/project: review in Claude Code, Claude will automatically execute this command.The key here is the
! backtick:The line
!git diff main...HEAD means: first run the git diff command, get the result, and then feed it to Claude.So Claude doesn't just see the text "git diff"; it sees the actual code differences.
Commands can also take arguments.
If you want the command to be more flexible, you can write it like this:
# Fix Issue

Get issue details and provide a fix:

!`gh issue view $ARGUMENTS`

Analyze this issue and suggest fix steps.
Running
/project: fix-issue 234 will directly feed the content of issue 234 into the prompt.Where to place commands?
-
Project commands - Place them in the
.claude/commands/folder. These commands are committed to git and available to the entire team. -
Personal commands - Place them in the
~/.claude/commands/folder. These commands are only available to you and will appear as/user: command-name.
The skills/ Folder: Let Claude Decide What to Do#
You now know how commands work. Skills and Commands look similar, but their triggering mechanisms are completely different.
First, the Key Difference:#
Skills are workflows that Claude can automatically invoke. You don't need to type a slash command; as long as your task matches the skill's description, Claude will use it automatically.
Commands are like a TV remote control - you press the "power" button, and the TV turns on. If you don't press it, nothing happens.
Skills are like an air conditioner's auto mode - you just say "I feel hot," and the air conditioner decides to cool down and starts working automatically.
How to Create Skills?#
Each skill is placed in its own subfolder, containing a
SKILL.md file:.claude/skills/
└── security-review/
├── SKILL.md
└── DETAILED_GUIDE.mdSKILL.md uses YAML frontmatter to describe when to use it:---
name: security-review
description: Perform security review on code, check for common vulnerabilities
---
# Security Review
Review code according to the standards in @DETAILED_GUIDE.md:
1. Check for SQL injection risks
2. Validate input validation
3. Check for sensitive data leaks
4. Review access controlsWhen you say "review the security issues in this PR," Claude reads the skill's description, finds it matches your task, and automatically invokes this skill. You can also manually invoke it by typing
/security-review.The Biggest Difference Between Skills and Commands:#
A Command is just one file that says what to do.
A Skill can come with a bunch of related files.
For example, in the example above, the
SKILL.md file references @DETAILED_GUIDE.md, meaning "go read the DETAILED_GUIDE.md file next to it." This allows the skill to use the detailed rules from that file.Where to Put Personal Skills?#
Place them in the
~/.claude/skills/ folder so they are available across all your projects.The agents/ Folder#
Some tasks are too complex, and you want Claude to call in an expert for help.
For example, you ask Claude: "Help me thoroughly review these 500 lines of code."
If Claude does this in the main conversation, it will display every file inspection process, every minor issue found, and every step of analysis. Your chat history will be flooded with hundreds of intermediate messages, making it unreadable.
This is where an agent comes in.
An agent allows Claude to work in the "background." It silently reviews all the code and then only tells you the final result (e.g., "found 3 security issues, 5 performance issues"). Your chat history stays clean, showing only the useful conclusions.
An agent is a "little assistant" specialized in a specific task. You create a markdown file in the
.claude/agents/ folder, telling it:.claude/agents/
├── code-reviewer.md
├── security-auditor.md
└── performance-analyzer.mdExample
code-reviewer.md:---
name: code-reviewer
description: Review code quality, style, and best practices
tools: [Read, Grep, Glob]
model: claude-3-5-haiku-20241022
---
You are a code review expert. When reviewing code, focus on:
1. Code style consistency
2. Potential bugs and edge cases
3. Performance issues
4. Maintainability
Provide specific improvement suggestions, referencing specific lines of code.Claude will launch this agent in the background to work independently. Once the agent finishes, it compiles its findings into a brief report and tells you. Your main conversation won't be flooded with hundreds of intermediate steps.
The
tools field limits which tools the agent can use. A code review agent only needs Read, Grep, and Glob; it doesn't need file write permissions.The
model field determines which AI model to use. Simple tasks use Haiku (cheap, fast), complex tasks use Sonnet or Opus (more expensive but smarter). This saves money and improves efficiency.Personal agents go in
~/.claude/agents/ and are available across all projects.settings.json: Permissions and Project Configuration#
The
settings.json file inside .claude/ controls what Claude is allowed and not allowed to do. It defines which tools Claude can run, which files it can read, and whether it needs to ask before running certain commands.Complete file example:
{
  "$schema": "https://cdn.gooo.ai/schemas/claude-settings.json",
  "allow": [
    "Bash(npm run *)",
    "Bash(make *)",
    "Bash(git *)",
    "Read",
    "Write",
    "Edit",
    "Glob",
    "Grep"
  ],
  "deny": [
    "Bash(rm -rf *)",
    "Bash(curl *)",
    "Read(.env)",
    "Read(secrets/**)"
  ]
}
What Each Part Does#
$schema Line#
When writing the configuration, your editor will prompt you with valid options, preventing errors. Don't delete this line.
allow List#
Things Claude can do directly without asking you each time:
- Run project commands (
npm run *,make *) - View git history (
git *) - Read and write files (
Read,Write,Edit,Glob,Grep)
Deny List - Things Claude Must NOT Do:#
- Delete files (
rm -rf) - Access the network (
curl) - Read password files (
.env,secrets/)
If something is not in either of these two lists, Claude will ask you before doing it.
settings.local.json: Personal Permission OverridesSame concept as CLAUDE.local.md. Used to store your personal permission settings, for example, if you want Claude to be able to delete files on your own computer but don't want other team members to have that ability. This file is not committed to git, so only you can use it.
Global ~/.claude/ Folder#
This folder stores your personal settings and mainly contains the following:
~/.claude/CLAUDE.md - Your personal preferences. For example, "I like code with lots of comments." Write it here, and Claude will apply it across all projects.~/.claude/projects/ - Claude's chat history and notes for each of your projects. Type /memory to view them.~/.claude/commands/ and ~/.claude/skills/ - Your custom quick commands and skills, usable across all projects.You don't need to manage it normally. But if Claude inexplicably "remembers" things you never said, or you want to delete a project's memory, come here to look.
Complete Structure#
Putting everything discussed above together, it looks like this:
Project Level (
.claude/)├── CLAUDE.md # Team instructions (required)
├── CLAUDE.local.md # Your personal overrides (gitignored)
├── settings.json # Team permissions
├── settings.local.json # Your permission overrides (gitignored)
├── rules/ # Modular instructions
│ ├── api-conventions.md
│ ├── testing.md
│ └── security.md
├── commands/ # Team custom commands
│ ├── review.md
│ └── fix-issue.md
├── skills/ # Team reusable workflows
│ └── security-review/
│ ├── SKILL.md
│ └── DETAILED_GUIDE.md
└── agents/ # Team specialized sub-agents
├── code-reviewer.md
└── security-auditor.mdGlobal Level (
~/.claude/)├── CLAUDE.md # Your global preferences
├── projects/ # Sessions and memories for each project
│ └── your-project/
│ ├── transcripts/
│ └── memory.md
├── commands/ # Your personal commands
├── skills/ # Your personal skills
└── agents/ # Your personal agents
How to Get Started as a Beginner?#
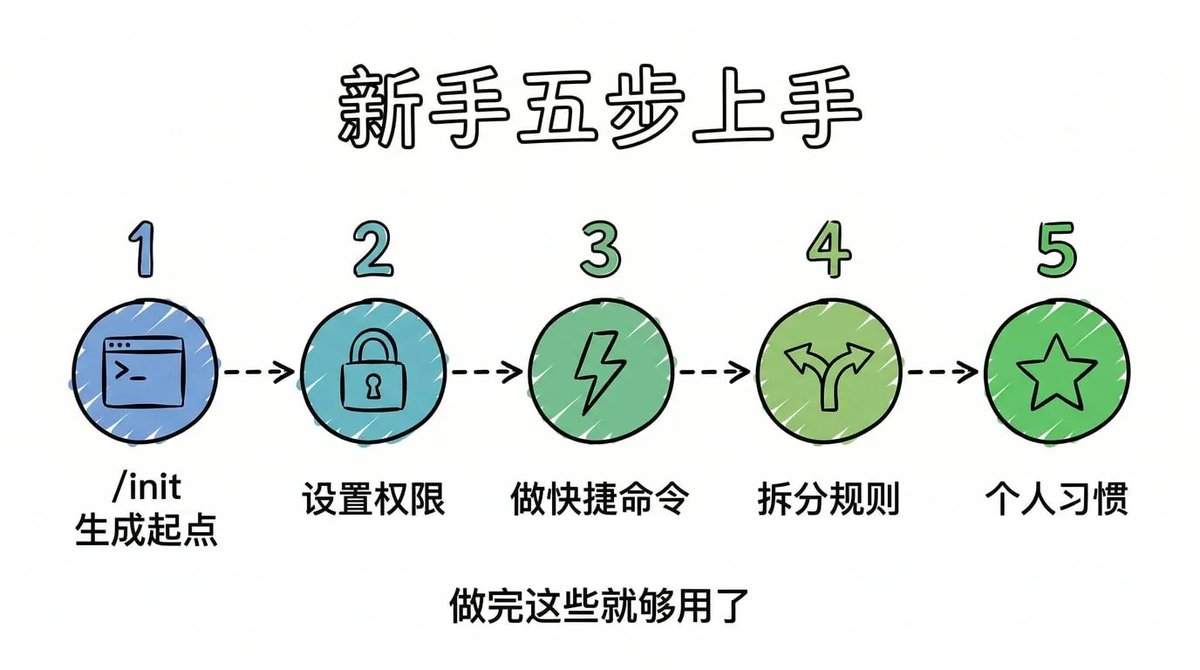
If you're using this for the first time, follow this order:
Step 1: Let Claude Generate a Starting Point
Type
/init in Claude Code. It will look at your project and automatically generate a CLAUDE.md file. Then delete the unimportant parts, keeping only the most critical rules.Step 2: Set Permissions
Create the
.claude/settings.json file to tell Claude what it can and cannot do. At minimum, write two rules: allow it to run your project commands (e.g., npm run dev), and forbid it from reading .env files (which contain passwords).Step 3: Create One or Two Quick Commands
Think about the tasks you ask Claude to do most often, like "review code" or "fix bugs," and turn them into commands. In the future, just type
/review instead of typing a long prompt every time.Step 4: Split Up Rules When There Are Too Many
When your CLAUDE.md file gets too long, split it into several smaller files and place them in the
.claude/rules/ folder. Keep API rules in one file, testing rules in another—this makes management easier.Step 5: Add Your Personal Preferences
Create
~/.claude/CLAUDE.md in your computer's user folder and write your own preferences. For example, "I prefer writing types before code" or "I like using functional programming style." This way, no matter which project you open, Claude will remember your habits.After completing these five steps, it's basically sufficient. 95% of projects only need this. As for skills and agents, those are advanced features you'll only need when you have particularly complex repetitive tasks.
Final Thoughts#
The
.claude folder is used to tell Claude: "Who I am, what my project is about, and how you should work."The clearer you write it, the fewer mistakes Claude will make, and the less rework you'll have to do.
The most important file is CLAUDE.md. Get that right first; everything else is just icing on the cake.
Don't try to use all the features at once. Start simple and add things gradually.
This article is a deep compilation based on Akshay's content:
https://x.com/akshay_pachaar/status/2035341800739877091
🫶 Thanks for reading this far. If it was helpful, feel free to follow my X account 👉@imaxichuhai, where I continuously share insights on AI thinking, AI tool usage experiences, and more.
Also, feel free to follow my WeChat public account: