Beginner
How to Achieve Token Freedom for Under 100 Yuan per Month (Step-by-Step Guide)
How to Achieve Token Freedom for Under 100 Yuan per Month (Step-by-Step Guide)
In scenarios involving parallel tasks, batch Agent execution, or long interactive programming sessions, a single account frequently triggers rate limits.
The solution is simple: pool multiple Plus accounts together. Use
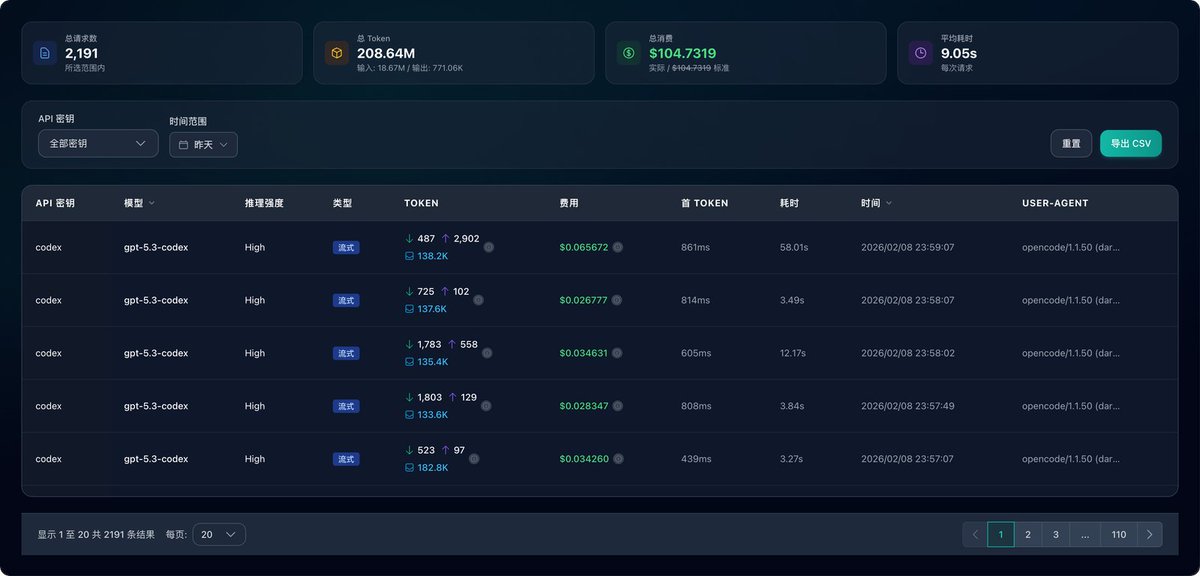
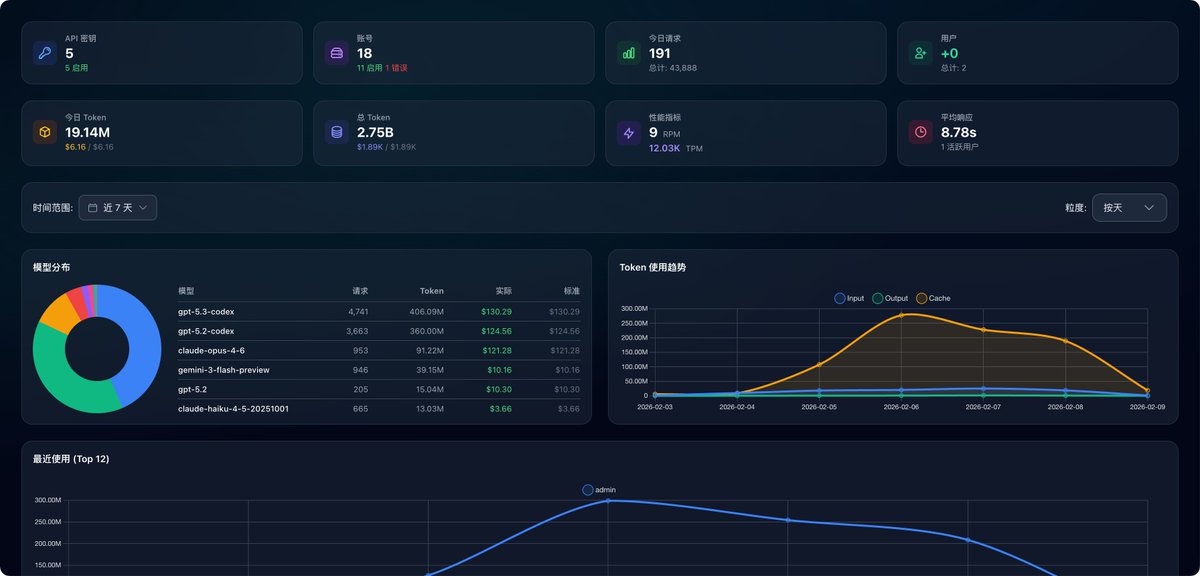
sub2api to expose a single API endpoint externally, while internally scheduling accounts and load balancing based on real-time quota status.More importantly, the cost of this solution is very controllable. The image below shows my actual usage from yesterday: 200 million tokens.
Now, let's dive into this detailed guide. If you find it helpful, please give it a like 🥰. Thank you very much.
Long post warning, recommend saving it first.
Solution Overview: sub2api + Multi-Account Pool Architecture#
sub2api is an open-source AI API gateway platform specifically designed for managing and distributing AI subscription quotas. Its core features include:- Unified Interface: Consolidates multiple Claude/Codex Plus accounts into a single API endpoint.
- Intelligent Scheduling: Automatically selects available accounts based on real-time quota to avoid rate limits.
- Load Balancing: Supports account grouping and weight configuration for reasonable request distribution.
- Carpool Sharing: Can generate multiple API Keys to share usage with friends.
- Usage Monitoring: Web panel for real-time viewing of each account's usage and request statistics.
Architecture Diagram:
Your Application/Tool
    ↓ (Uses API Key)
sub2api Gateway (Docker Deployment)
    ↓ (Intelligent Scheduling)
Account Pool: Plus Account 1, Plus Account 2, Plus Account 3...
    ↓
Claude/Codex Official API
The entire system is deployed with a single command using Docker Compose, including the backend service, PostgreSQL database, and Redis cache.
Costs and Prerequisites#
This solution is not "zero cost," but the overall investment is very manageable:
- An overseas VPS
- Recommended: Singapore node for low latency and stable access from China.
- A lightweight server from Alibaba Cloud/Tencent Cloud for about 30 yuan/month is sufficient.
- Several Codex Plus accounts
- The quantity depends on your usage intensity. It's recommended to start with 2 for testing and add more if needed.
- ⚠️ Important Note: This is not about purchasing the accounts themselves, but paying for the service of being "invited into a Business team." You need to provide an email address already registered with OpenAI. The seller will invite your account into their Business team, granting you access to Codex 5.3.
- Price on Xianyu is usually around 10 yuan/account (monthly billing).
- A domain name (Recommended)
- ⚠️ Important: Direct access via IP may cause frontend JS files to fail to load. It is strongly recommended to bind a domain name.
- You can purchase a domain name on platforms like Alibaba Cloud or Tencent Cloud. A cheap one will do.
Deployment Steps#
Prerequisites#
-
Install Docker and Docker ComposeEnsure Docker and Docker Compose V2 are installed on your server.
-
Install 1Panel (Recommended)1Panel is an open-source Linux server operation and maintenance management panel. It facilitates managing Docker containers, configuring reverse proxies, binding domain names, etc. It is highly recommended, especially for scenarios requiring domain name access.Installation command:
bash bash -c "$(curl -sSL https://resource.fit2cloud.com/1panel/package/v2/quick_start.sh)"Installation steps:- Select language (Chinese/English).
- Press Enter all the way to use default configurations.
- Important: Remember the following displayed after installation:
- Security entry
- Panel username
- Panel password
- External access address (e.g.,
http://YOUR_SERVER_IP:24045/security_entry)

- Access the external address in your browser and log in with the username and password.
 If you cannot access the panel:It is likely that the server firewall has not opened the port. 1Panel uses port 24045 by default. You need to add an inbound rule in your cloud server's security group to open this port.
 The role of 1Panel:
- Visually manage Docker containers.
- Configure Nginx reverse proxy and bind domain names.
- Automatically apply for and renew SSL certificates (Let's Encrypt).
- Monitor server resource usage.
After installation, you can proceed with deployingsub2api.
Deploying sub2api#
sub2api provides two docker-compose configuration files:docker-compose.local.yml: Data is stored in a local directory, making backup and migration easier (Recommended).docker-compose.yml: Data is stored in Docker named volumes, suitable for simple scenarios.
This tutorial uses
docker-compose.local.yml for deployment.Docker Compose Deployment Steps#
Step 1: Create the project directory
mkdir -p ~/sub2api && cd ~/sub2apiStep 2: Download the docker-compose configuration file
wget https://raw.githubusercontent.com/Wei-Shaw/sub2api/main/deploy/docker-compose.local.ymlOr use
curl:curl -o docker-compose.local.yml https://raw.githubusercontent.com/Wei-Shaw/sub2api/main/deploy/docker-compose.local.ymlStep 3: Create the
.env configuration filecat > .env << 'EOF'
# Database Configuration
POSTGRES_USER=sub2api
POSTGRES_PASSWORD=your_secure_db_password_here
POSTGRES_DB=sub2api
# Redis Configuration
REDIS_PASSWORD=your_secure_redis_password_here
# Application Configuration
JWT_SECRET=your_jwt_secret_here_min_32_chars
ADMIN_PASSWORD=your_admin_password_here
# Service Port (Optional, default 8080)
APP_PORT=8080
EOFStep 4: Generate secure random keys
⚠️ Important: You must use strong passwords! You can use the following command to generate them:
# Generate JWT_SECRET (at least 32 characters)
openssl rand -base64 32
Generate ADMIN_PASSWORD#
openssl rand -base64 16Fill in the generated key in the corresponding location in the
.env file, or use the following commands to automatically append (note: this will overwrite previous values):sed -i "s|your_jwt_secret_here_min_32_chars|$(openssl rand -hex 32)|" .env
sed -i "s|your_admin_password_here|$(openssl rand -hex 16)|" .env
sed -i "s|your_secure_db_password_here|$(openssl rand -hex 16)|" .env
sed -i "s|your_secure_redis_password_here|$(openssl rand -hex 16)|" .envStep 5: Start Services
docker compose -f docker-compose.local.yml up -d
Step 6: Check Service Status
docker compose -f docker-compose.local.yml psYou should see all three containers in the Up state:
- sub2api (main service)
- postgres (database)
- redis (cache)

Step 7: View Admin Password
Check the admin password in the
.env file:cat .env | grep ADMIN_PASSWORDOr view the full configuration:
cat .env
Configure Domain Access (Recommended)#
⚠️ Important: Direct IP access may cause frontend JS files to fail loading. Configuring domain access is strongly recommended.
Step 1: Sync 1Panel App Store
First-time users of 1Panel need to remotely sync the app store.

Step 2: Install OpenResty
Search for and install OpenResty (an enhanced version of Nginx) in the app store. Click install and use the default configuration.
Step 3: Create a Reverse Proxy Website
- In 1Panel, go to "Websites""Create Website" → select "Reverse Proxy"
- Fill in the configuration:
- Main Domain: Enter your domain (e.g., sub2api.yourdomain.com)
- Proxy Address:
127.0.0.1:8080 - Keep other options as default
- Click confirm to create

Step 4: Configure DNS Resolution
In your domain registrar's console (e.g., Alibaba Cloud, Tencent Cloud, Cloudflare), add an A record:
- Record Type: A
- Host Record: sub2api (or your desired subdomain)
- Record Value: Your server's public IP
- TTL: Default value (usually 600 seconds)

Step 5: Verify Access
Wait for DNS propagation (usually 1-10 minutes), then access your domain in a browser (e.g., http://sub2api.yourdomain.com) to check if the page displays correctly.

First Login#
Access your domain in a browser (e.g., https://sub2api.yourdomain.com) or http://YOUR_SERVER_IP:8080 (if no domain is configured)

Log in with the admin account:
- Email:
admin@sub2api.local - Password: The
ADMIN_PASSWORDset in the.envfile
If you forget the password, check the
.env file:cat ~/sub2api/.env | grep ADMIN_PASSWORDConfigure Account Pool#
1. Create Account Groups#
Before adding accounts, it's recommended to create groups for better management and scheduling of accounts from different sources.
In the management panel, click "Groups" → "Create New Group"

Fill in the group information:
- Group Name: A name for the group (e.g., "Codex Account Pool")
- Platform: Select the platform type
- For Codex Plus accounts, select OpenAI
- For official Claude accounts, select Claude
- For Antigravity service, select Antigravity
- Description: Group description (optional)

2. Add Codex Plus Accounts#
After creating the group, click "Accounts" → "Add Account"
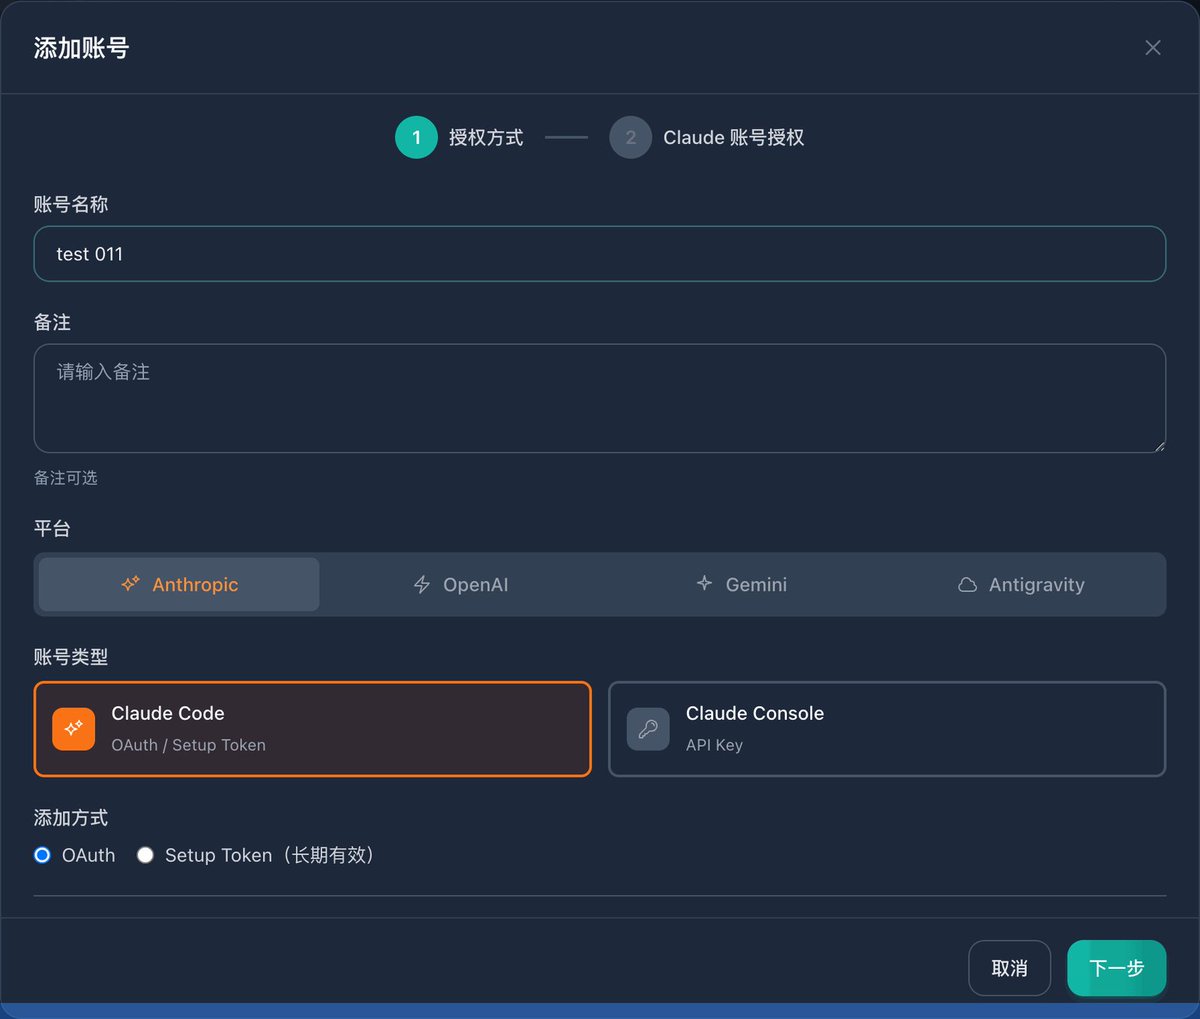
Fill in the account information:
- Account Type: Select based on account type
- Codex Plus accounts: Select OpenAI
- Official Claude accounts: Select Claude
- Antigravity service: Select Antigravity
- Session Key: Enter the account's Session Token
- Account Name: Give the account a recognizable name (e.g., "Codex Plus Account 1")
- Group: Select the group you just created (e.g., "Codex Account Pool")
- Weight: Higher number means higher scheduling probability (default 1 is fine)
How to get the Session Token:
- Copy the authorization link and open it in a new tab
- Log in to the platform, which will redirect to the authorization page
- Click authorize, which will redirect to a localhost address
- Copy the complete localhost link and paste it back

Repeat the above steps to add all Plus accounts.

3. Create API Key#
Click "API Keys" → "Create New Key"
Configuration options:
- Key Name: Name for the API Key (e.g., "My Development Environment")
- Rate Limit: Rate limiting (optional)
- Quota: Quota limit (optional)
- Account Groups: Select the group(s) created earlier
After creation, an API Key will be generated.

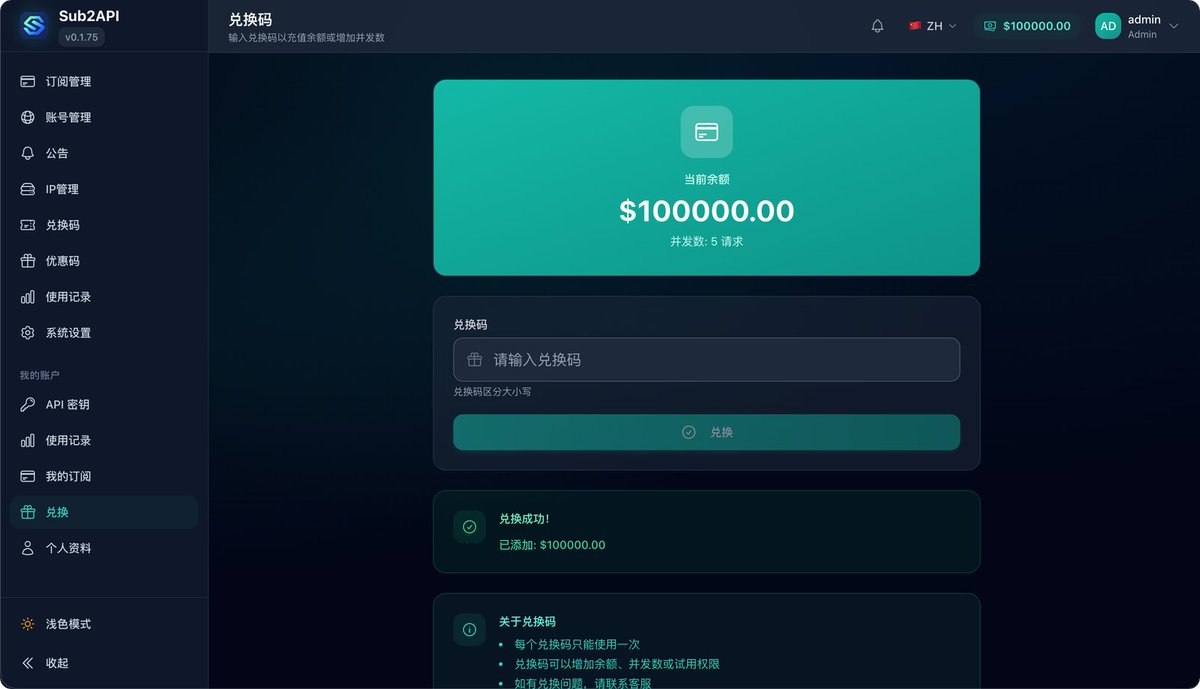
4. Top Up Account (Using Redemption Codes)#
After creating an API Key, you need to top it up to use the API. sub2api uses a redemption code system for quota management.

Step 1: Generate Redemption Code
- In the management panel, click "Redemption Codes"
- Fill in the redemption code information:
- Amount: Top-up amount (virtual quota for internal billing)
- Expiry Date: Redemption code validity (optional)
- Max Uses: Maximum number of uses (default 1)
- Click create, and the system will generate a redemption code
Step 2: Use Redemption Code to Top Up
- In the management panel, click the user menu in the top right corner"Redeem"
- Enter the generated redemption code
- Click "Redeem" to confirm the top-up
- After successful top-up, your account balance will increase, and the API Key can be used normally
Notes:
- The redemption code system is mainly for carpooling scenarios. The admin can generate codes and distribute them to other users.
- For personal use, generate a large-amount code and top up your account in one go.
- The top-up amount is virtual and does not involve real currency transactions. It is used for internal quota management.
Using API in Coding Agents#
After configuration, you can use the API provided by sub2api in various AI coding tools.
Method 1: Quick Configuration with cc-switch (Recommended)#
cc-switch is an open-source configuration management tool that allows quick switching between different AI service provider configurations without manually modifying each coding agent's config file.Project URL: https://github.com/farion1231/cc-switch
Important Notes:
- API Keys are bound to account groups. Different platforms require creating corresponding API Keys.
- For example: Codex, Claude, and Gemini require three separate API Keys (each associated with the corresponding account group).
- For unified management, you can customize the name when creating API Keys and use the same Key value (but ensure the Key is associated with account groups for all platforms).
Configuration Example:
- Claude Configuration

- Codex Configuration
Fill in your domain and API Key according to the format shown in the images.
Method 2: Manual Configuration File Modification#
If your tool does not support
cc-switch, you can manually modify the configuration file.OpenCode Configuration
OpenCode requires configuring baseURL and API Key for three platforms:
{
  "$schema": "https://opencode.ai/config.json",
  "provider": {
    "anthropic": {
      "options": {
        "baseURL": "https://sub2api.yourdomain.com/v1",
        "apiKey": "your_claude_api_key"
      }
    },
    "google": {
      "options": {
        "baseURL": "https://sub2api.yourdomain.com/v1beta",
        "apiKey": "your_gemini_api_key"
      }
    },
    "openai": {
      "name": "OpenAI",
      "options": {
        "baseURL": "https://sub2api.yourdomain.com/v1",
        "apiKey": "your_codex_api_key"
      }
    }
  }
}
Configuration Notes:
- Replace
sub2api.yourdomain.comwith your actual domain - Replace
your_api_keywith the API Key created in the sub2api management panel - Use the corresponding API endpoints for different platforms (Claude and OpenAI use
/v1, Google uses/v1beta)
Usage Effects and Considerations#
After deployment, you will have:
- Seamless Switching: When an account hits a rate limit, the system automatically switches to another available account, keeping your workflow uninterrupted.
- Usage Monitoring: View real-time usage and remaining quotas for each account in the management panel.
- Cost Optimization: When sharing among multiple users, the cost per person is significantly reduced.
Typical Usage Scenarios:
- Single Heavy User: 3-5 Plus accounts are generally sufficient.
- 2-3 Users Carpooling: 2 accounts per person, totaling 4-6 accounts in the pool.
- Small Team (5 people): 10-15 accounts, averaging 2-3 per person.
Common Issues#
1. Frontend JS Files Fail to Load via IP#
Problem Description:
Docker containers start successfully, but when accessing via
http://YOUR_SERVER_IP:8080, the page does not display correctly. The browser console shows JS file loading failures (e.g., index-CP0CNDtB.js returns 404).
Cause:
This is a frontend resource path configuration issue in sub2api. Direct IP access may cause static resource loading failures.
Solution:
Method 1: Bind a Domain (Recommended)
- Prepare a domain and point an A record to your server IP.
- Configure a reverse proxy using 1Panel:
- In 1Panel, go to "Websites""Create Website" → "Reverse Proxy"
- Domain: Enter your domain (e.g., sub2api.yourdomain.com)
- Proxy Address:
http://127.0.0.1:8080 - Enable HTTPS (optional)
- Access via domain:
https://sub2api.yourdomain.com
Method 2: Modify docker-compose Configuration (Temporary Solution)
If you don't have a domain yet, try adding an environment variable in
docker-compose.local.yml:environment:
- BASE_URL=http://YOUR_SERVER_IP:8080Then restart the services:
docker compose -f docker-compose.local.yml down
docker compose -f docker-compose.local.yml up -d
Note: Domain access is strongly recommended. It not only solves the JS loading issue but also allows HTTPS configuration for security.
Summary#
With the sub2api + multi-account pool solution, you can achieve virtually unlimited Claude/Codex usage at a relatively low cost (a $30 VPS + several subscription accounts). While the deployment process requires some technical knowledge, once configured, the user experience is nearly identical to using the official API.
This solution is particularly suitable for:
- Personal Heavy Use: Say goodbye to single-account rate limits. Multi-account auto-rotation keeps your AI coding workflow continuous.
- Carpooling with Friends: Share costs among several people. Each person pays very little for ample usage. The redemption code system allows flexible quota allocation.
- Team Collaboration: For small development teams, this solution maximizes the value of subscription accounts. Compared to each person buying a Plus account individually, a centrally managed account pool is not only cheaper but also allows dynamic resource allocation based on actual usage, preventing idle accounts while others frequently hit rate limits. Team admins can monitor usage and set quota limits to ensure fair resource distribution.
If you are a heavy AI coding user or a team needing stable, cost-effective AI capabilities, this solution is worth trying.
Related Links:
- sub2api GitHub: https://github.com/Wei-Shaw/sub2api
- Online Demo: https://demo.sub2api.org/
- 1Panel Website: https://1panel.cn/
Thread#
Recent new articles. If they help you, please give them a like — it really matters to me, thank you! 🫡#
https://x.com/mkdir700/status/2030636031943618756
https://t.co/8pdoHu2Int
Author: mkdev | I love eating Qing Bu Liang (@mkdir700) URL: https://x.com/mkdir700/status/2030299845739811086https://t.co/KODdmd8r7M