Beginner
🔥Stop Paying 'IQ Tax' for Image Hosting! Cloudflare R2 + PicList, Set It Up Once, Relax for a Lifetime 😄
🔥Stop Paying 'IQ Tax' for Image Hosting! Cloudflare R2 + PicList, Set It Up Once, Relax for a Lifetime 😄
Free, Fast, Zero Maintenance!!!
If you're still anxious about image hosting traffic fees or tired of GitHub image hosting being blocked, this solution is worth a try. This article guides you through configuring Cloudflare R2 + PicList from scratch, achieving a complete workflow: "Screenshot → Paste → Auto Upload → Get Link".
1. Why Choose Cloudflare R2 + PicList#
Anyone who has used image hosting has likely encountered pitfalls: Qiniu and Upyun's free quotas keep shrinking, Alibaba Cloud OSS charges for outbound traffic per GB causing constant worry, and GitHub image hosting accessibility in China is hit or miss.
The emergence of Cloudflare R2 basically ends these troubles. It's based on the S3 protocol, but outbound traffic is completely free—this is the biggest difference from other object storage services. Paired with the PicList client, which natively supports R2, no plugins are needed, and it comes with WebP conversion and cloud album management.
A simple comparison of costs for mainstream solutions:
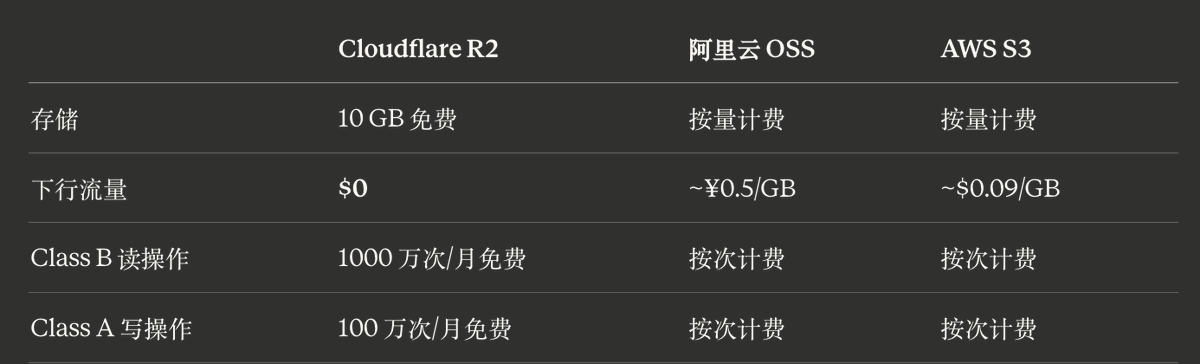
For personal blogs, note-taking with images, and similar scales, R2's free quota is basically impossible to exhaust.
2. Cloudflare R2 Configuration#
2.1 Create Bucket + Generate API Token
Log in to the Cloudflare Dashboard, go to R2 Object Storage on the left, and click Create bucket.

It's recommended to name the bucket concisely and meaningfully, like
img or blog-images.

After creation, go to the R2 Overview page → Manage R2 API Tokens → Create API Token. Select Object Read & Write permissions, and you can limit the scope to the bucket you just created.


After successful creation, three key values will be displayed. Be sure to save them:
- Access Key ID
- Secret Access Key
- Endpoint URL (format similar to
https://<account_id>.r2.cloudflarestorage.com)
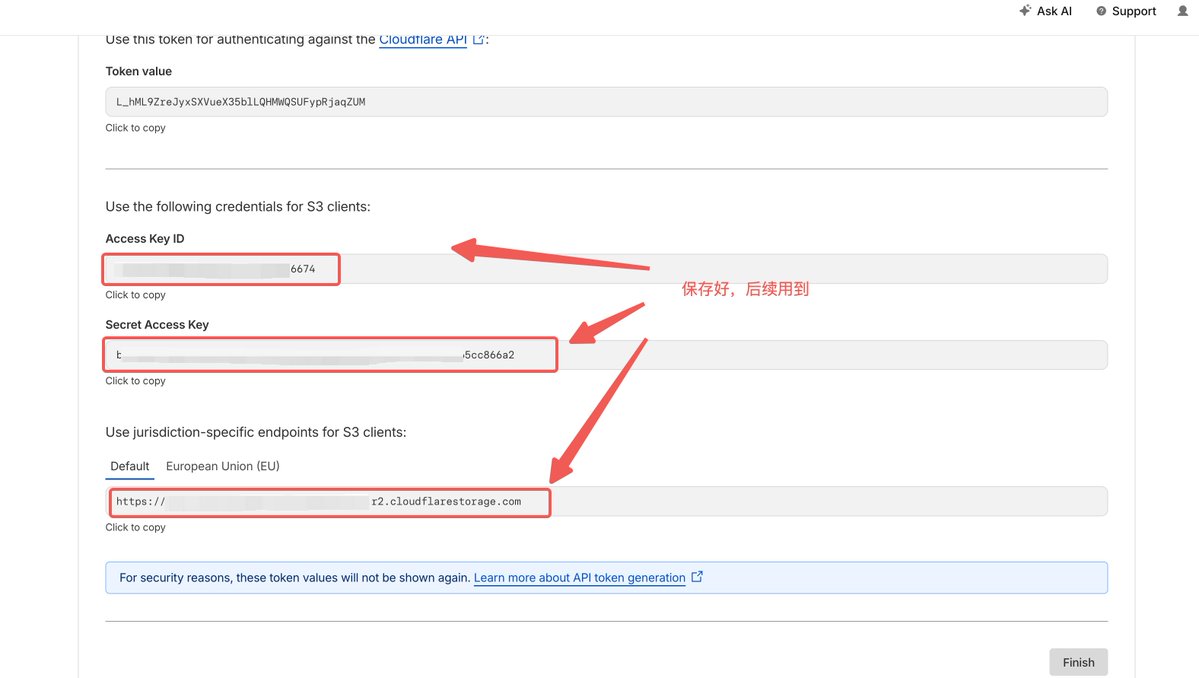
⚠️ The Secret Access Key is only shown once. If you close the window, you won't see it again. It's recommended to save it immediately.
2.2 Bind Custom Domain & WAF Protection
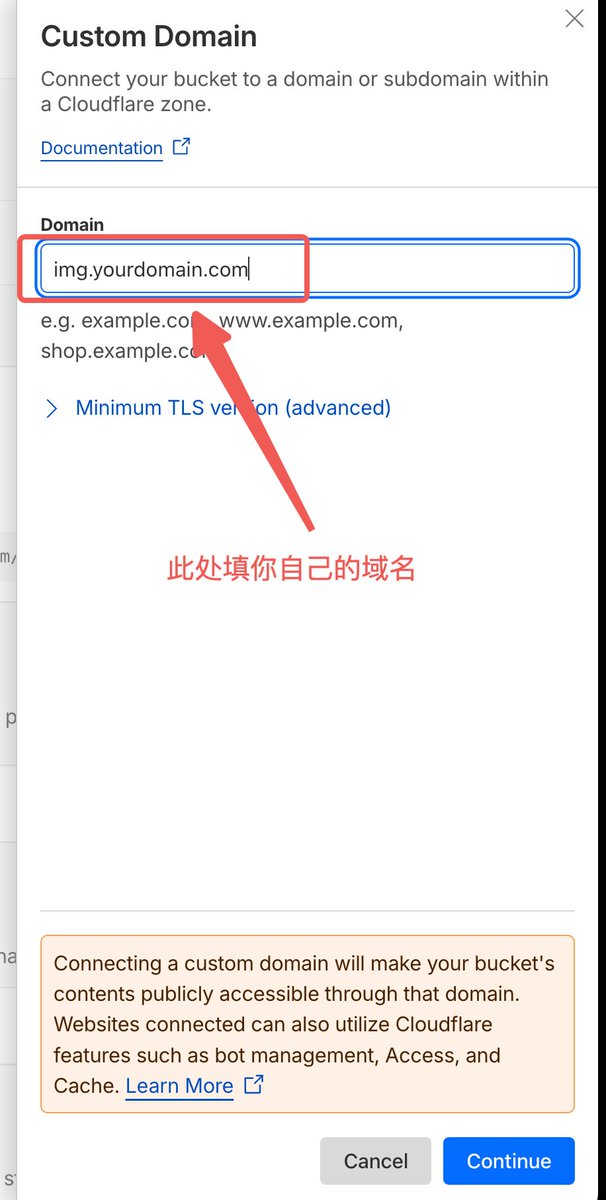
If your domain is already managed by Cloudflare (or accessed via CNAME), binding a custom domain is very simple: Go to Bucket → Settings → Custom Domains → Connect Domain, enter the subdomain you want to use (e.g.,
img.yourdomain.com). Cloudflare will automatically add the DNS record and issue an SSL certificate.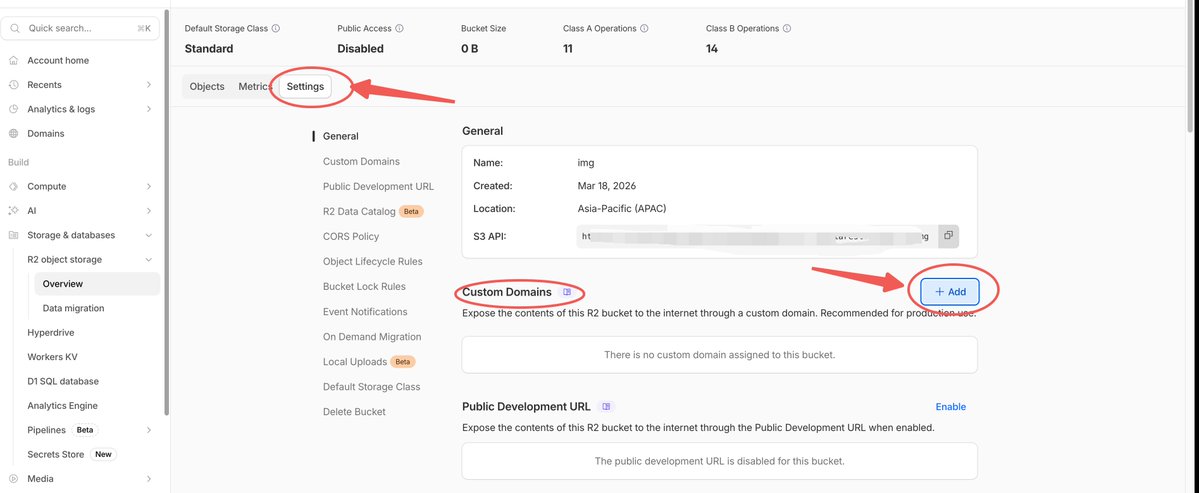
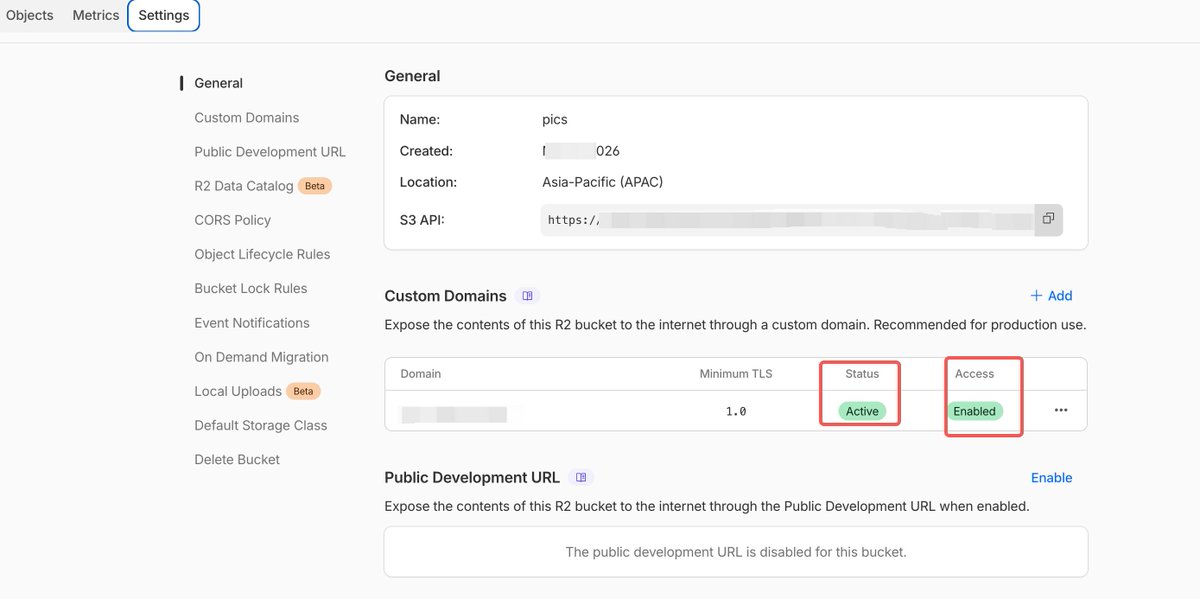
After binding is complete, visit
https://img.yourdomain.com in your browser to confirm it works.(Optional, doesn't affect usage) It's recommended to configure WAF protection to prevent malicious high-frequency requests from exhausting your operation quota. Go to your domain's Security → WAF, add a Rate Limiting rule: e.g., Block if the same IP makes more than 100 requests per minute. You can also add a Referer validation rule to only allow image references from your own domain.
3. PicList Client Configuration#
3.1 Connect to R2
Go to PicList GitHub Releases to download and install the latest version.
Open PicList, go to Image Hosting Settings, select Amazon S3 (R2 is compatible with the S3 protocol). Fill in the following information:
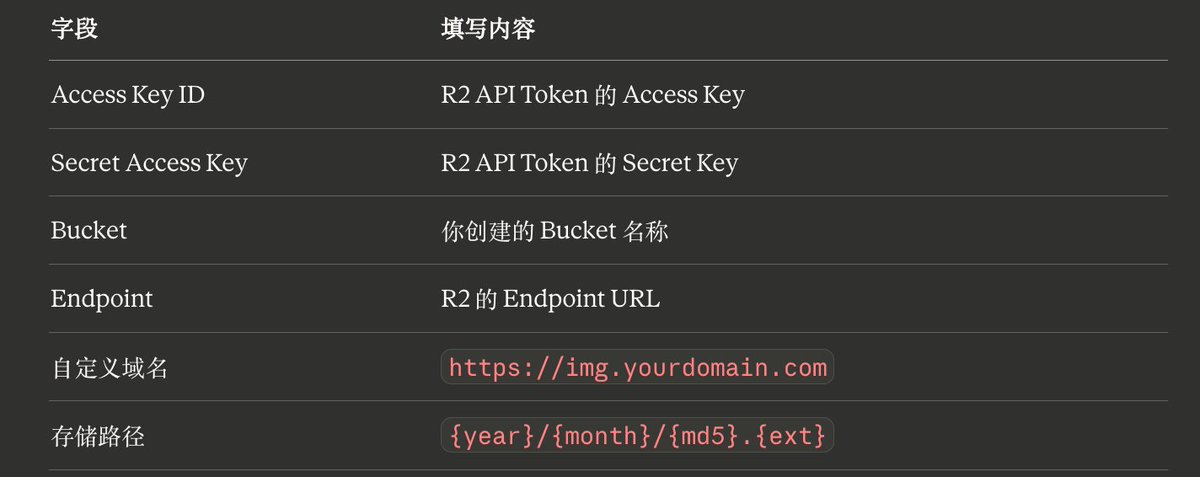

Use
{year}/{month} for the storage path template to archive by month, and {md5} as the filename to avoid duplicates. This keeps things organized.After filling, click Confirm and Set as Default Image Hosting. Upload any image to test; if you get a link, the configuration is successful.
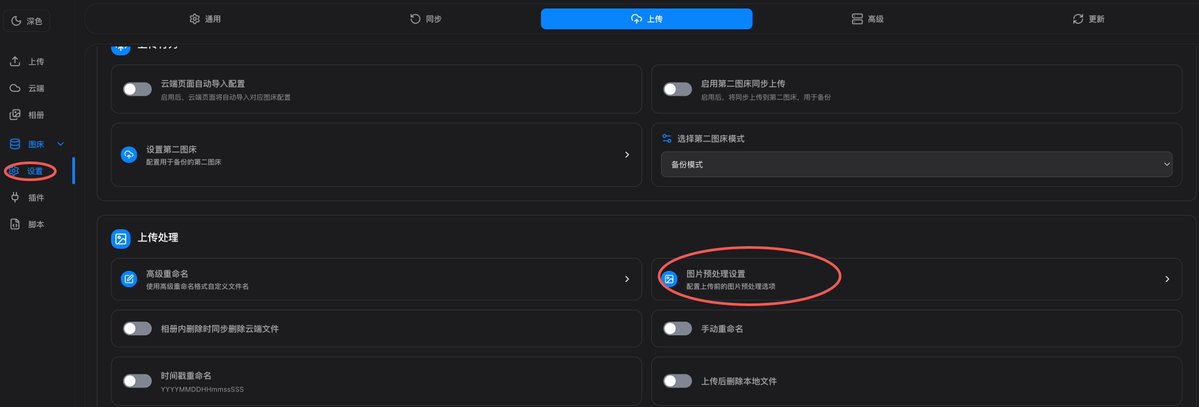
3.2 WebP Auto Conversion & Album Management
PicList has built-in format conversion before upload. Go to PicList Settings → Upload Processing → Image Preprocessing Settings → Image Format Selection → Target WebP. Enable this, and all images will be automatically converted to WebP format before upload. In practice, a 500 KB PNG screenshot is typically reduced to around 100–150 KB after conversion, a reduction of about 70%.

🔥PicList has many settings; I won't list them all. Explore them yourself. 🚀
【Highlight Feature】PicList's album feature can directly read the file list from your R2 Bucket, acting as a cloud image manager. It supports batch deletion, search, and one-click copying of Markdown / HTML / URL format links, making management much more convenient than logging into the Cloudflare Dashboard.

4. Obsidian Integration#
If you use Obsidian for notes or blogging, you can achieve automatic upload when pasting images.
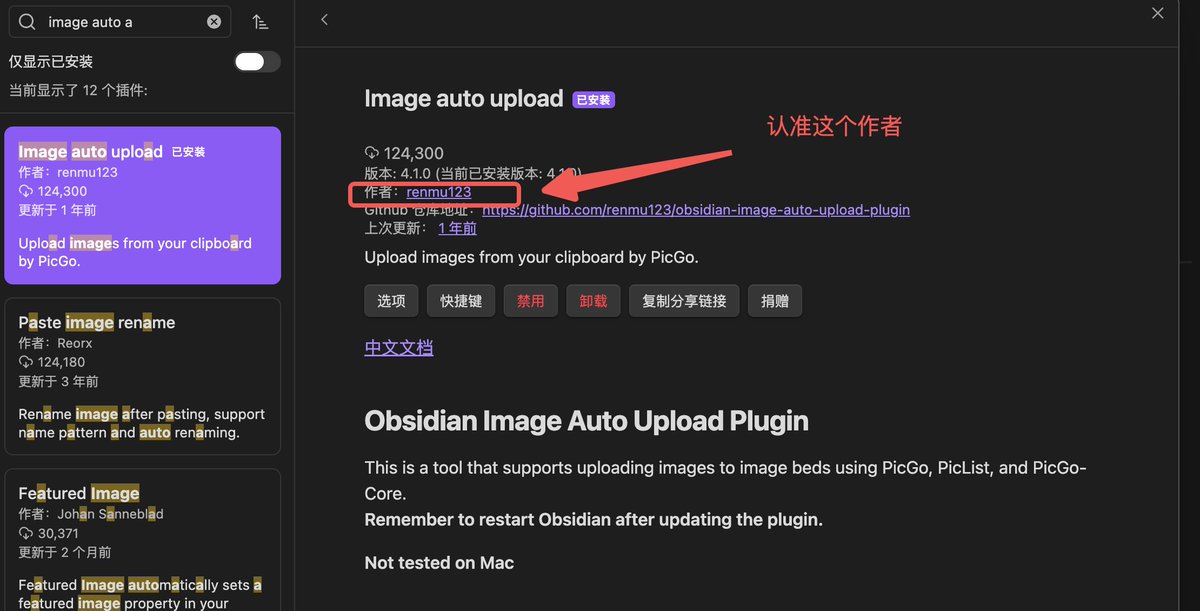
Install the community plugin Image Auto Upload (by renmu123). In the plugin settings, set the upload method to PicList, and ensure the PicList client is running in the background. After configuration, when you directly paste a screenshot in Obsidian, the plugin will automatically call PicList to upload it to R2 and replace it with a remote link, making the writing process completely seamless.
🚀There are many tutorials online; you can refer to the one below🔥
Quoted tweet https://t.co/lvvO3dO6eh https://x.com/i/web/status/2029762985628160110
5. Frequently Asked Questions (FAQ)#
When does R2 incur charges?
Charges only start when storage exceeds 10 GB, Class A write operations exceed 1 million/month, or Class B read operations exceed 10 million/month. It's very difficult to reach these limits for personal image hosting scenarios. The prices for exceeding are also very low: storage $0.015/GB/month, operations $4.50/million (Class A).
How to troubleshoot 403 errors when accessing images?
The most common reasons are that the Bucket doesn't have public access enabled, or the custom domain isn't correctly bound. Go to Bucket Settings to confirm the Custom Domain status is Active, or check if Allow Public Access is enabled.
Can I use it if my domain isn't managed by Cloudflare?
Yes, but it's slightly more troublesome. You need to add a CNAME record at your original DNS provider pointing to the domain provided by R2. However, if the domain itself is already managed by Cloudflare, the entire process is much smoother.
PicList or PicGo, which to choose?
PicList is an enhanced fork of PicGo, fully compatible with the PicGo plugin ecosystem. For R2 image hosting scenarios, the differences are quite noticeable:

Simply put, using PicGo with R2 requires installing plugins and configuring parameters, while PicList works out of the box. If you're a new user, choose PicList for simplicity.
6. Summary#
Cloudflare R2 + PicList is currently one of the optimal solutions for personal image hosting: zero traffic fees, global CDN acceleration, native client support, automatic WebP conversion. Set it up once and you basically don't have to worry about it again.
If you want to tinker more later, you can explore Cloudflare Workers for real-time image processing (cropping, resizing), or enable Cloudflare's Image Resizing feature to generate different sizes on demand.
Feel free to discuss any questions in the comments.
If you found this useful, welcome to follow, bookmark, and share!
Thread#
🙂#
https://x.com/Lonely__MH/status/2034258027646456124
No text or media.