Beginner
《 Say Goodbye to OpenClaw's Sky-High Bills: Build a Private API Matrix in 20 Minutes, Self-Hosted Keys for Ultra-Low Cost Multi-Account 》 -- 2 / 3
《 Say Goodbye to OpenClaw's Sky-High Bills: Build a Private API Matrix in 20 Minutes, Self-Hosted Keys for Ultra-Low Cost Multi-Account 》 -- 2 / 3
《 Say Goodbye to OpenClaw's Sky-High Bills: Build a Private API Matrix in 20 Minutes, Self-Hosted Keys for Ultra-Low Cost Multi-Account 》 -- 2 / 3#
Suddenly realized my premium permissions allow me to publish articles now, no more editing in the cramped tweet input box, 55555 ~~
In this tutorial, we will build a complete server pool on a server, use a mature API backend management system, and employ enterprise-level solutions to avoid the risk of GPT account bans.
This must be based on the previous tutorial. Don't rush, follow step by step, and you will eventually deploy successfully. You can bookmark this one for now.
Link to the previous part: 《 Say Goodbye to OpenClaw's Sky-High Bills 》 -- 1 / 3
Answering some questions from the previous article:
-
How to buy two GPT business accounts for 20 RMB? Answer: Xianyu, search for "business account". I won't put the seller I bought from in the article. If you're unsure, you can DM me, and I'll send you where I bought it.
-
What's the principle behind achieving token freedom? Answer: Combine multiple GPT accounts into an account pool, integrate their Codex 5.3 usage permissions through sui-api, and then schedule these accounts through a unified API.
-
What's the difference between this solution and the fallbacks pool that comes with OpenClaw? Answer: Fallbacks is essentially OpenClaw's backup logic. When configuring models, you can configure OpenAI, Anthropic, DeepSeek... etc. OpenClaw will prioritize OpenAI. If OpenAI is not configured/configured incorrectly, it will call the second priority model, then the third... and so on. It's different from our solution. After our setup is complete, if new agents like OpenClaw / xxxx appear later, they can all use the API we configured this time.
Let's begin! Continue with the second step. Now we already have:
1⃣ Neon database: postgresql://neondb_owner:t-a1b92kbq-pooler.ap-southeast-1.aws.neon.tech/neondb?sslmode=require&channel_binding=require
Redis cloud cache: redis-cli --tls -u redis://default:ZDI5OGNiZWU1NTg2ODc3NjI2ZXAyMTIyNzM@chief-crayfish-12273.upstash.io:6379
Step 1: Add Your Domain to Cloudflare (Free)#
- Purchase a domain on Tencent Cloud, choose the cheapest one. I chose a .space domain, costing only 10 RMB.
- Go to https://dash.cloudflare.com/, log in with a Google account, and choose the free plan.
- Click the "Onboard a domain" button on the page, enter the purchased domain (e.g., ResearchWang13.com) in the input box. Note: without www or http://.
- Click the continue button, select the free plan.
- Cloudflare will automatically scan if your domain is bound to other IPs. Click continue.
- Until xxxxx.ns.cloudflare.com, yyyyy.ns.cloudflare.com appear. Do not close this page.
- Now go to the Tencent Cloud management page to modify the domain resolution address. Click "Modify DNS Server".
- Select "Use non-Tencent Cloud DNS", enter the domain resolution address provided by CF, and wait for successful submission.
- Return to the Cloudflare page, scroll down, and click the "I updated my nameservers" button.
- Skip all the following steps until your Cloudflare page shows the domain as active.
Step 2: Use CF's Free Zero Trust for Intranet Penetration#
- Go to CF's Zero Trust page, click the "Manage Tunnels" button, click "Add a Tunnel", choose any username.
- Many operating systems appear, choose docker, copy the command line below. docker run cloudflare/cloudflared:latest tunnel --no-autoupdate run --token eyJhIjoiMGUzZjYwNDQ4YjU4NThlZTcyYzNkM2UwM2NiYWM0YWMiLCJ0IjoiNDk1NDM1ZWYt Save the token starting with eyJh...
- Scroll down, click next.
- Select your purchased domain, Type select Http, port fill in app:8080, click "Complete setup".
Step 3: Run All Services on the Server (Execute in Order)#
- mkdir -p ~/ResearchWang13 && cd ~/ResearchWang13
- vim docker-compose.yml
- Paste the following content into the docker-compose.yml file.
version: '3.8'

services:
  app:
    image: weishaw/sub2api:latest
    container_name: sub2api_app
    restart: always
    environment:
      # --- Neon Database Fill in your own---

      - DB_HOST=ep-gentle-boat-a1b92kbq.ap-southeast-1.aws.neon.tech
      - DB_PORT=5432
      - DB_USER=neondb_owner
      - DB_PASSWORD=
      - DB_NAME=neondb
      - DB_SSL=true

      # --- Redis Cache Fill in your own---

      - REDIS_HOST=chief-crayfish-12273.upstash.io
      - REDIS_PORT=6379
      - REDIS_PASSWORD=
      - REDIS_TLS=true

      # --- Basic Security Configuration ---

      - JWT_SECRET=sk_sub2api_random_secret_key_please_change_me_to_be_safe
      - ADMIN_PASSWORD=
      - APP_PORT=8080
      - APP_ENV=production
      # --- WARP Proxy ---

      - HTTP_PROXY=socks5://172.17.0.1:40000
      - HTTPS_PROXY=socks5://172.17.0.1:40000
      - ALL_PROXY=socks5://172.17.0.1:40000

  # --- Cloudflare Tunnel Fill in your own---

  cloudflared:
    image: cloudflare/cloudflared:latest
    container_name: sub2api_tunnel
    restart: always
command: tunnel --no-autoupdate run --token Your zeroTurn token- Finally, run docker compose up -d. If everything shows "Started", it's successful.
Final Step! Configure the Account Pool in the Browser#
- Go to the domain you purchased, mine is ResearchWang13.
- If you enter the setup interface, input the values according to the format in the code above. Remember to enable SSL permissions.
- Click "Group Management" on the left, you need to create a new group for the account pool.
- Click "Account Management" on the left, click "Add Account", name it arbitrarily, select OpenAI, choose the OAuth method.
- Generate an authorization link, open the generated link in the server's browser, log in with your account that has already joined the business team. A token will be generated. Fill in the token, click "Complete Authorization".
- Test: On the account management page, each account has ... on the right. Click the test link, select the model. I chose GPT - 5.3 Codex. If the test is successful, it's good.
- Generate a dedicated API key. Click "API Keys" on the left, create a key. Note: fill the quota with 0.
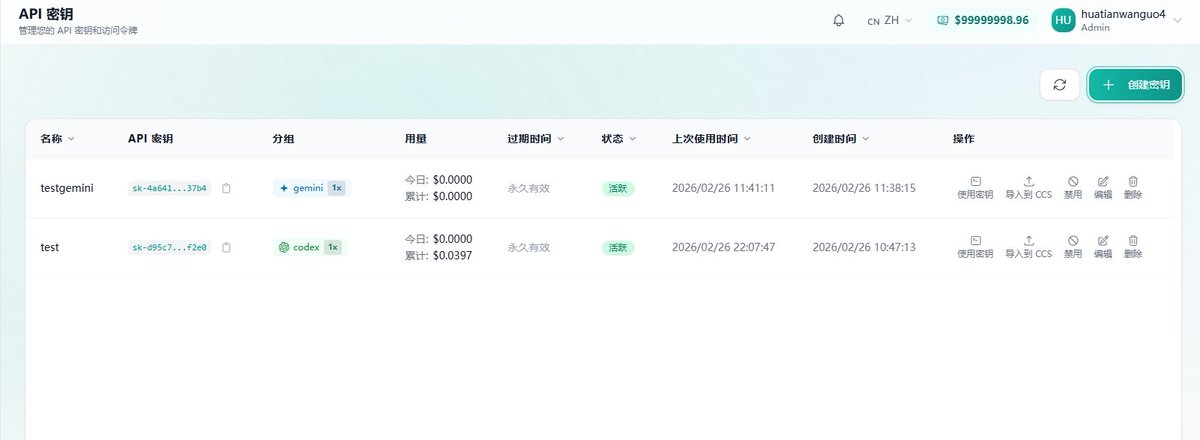
- Finally, test on the server with the following code to see if the API key can be used normally. If the return value contains the model name, it's successful.
curl --location 'https://your-domain/v1/responses?/chat/completions' --header 'Authorization: Bearer your-API ' --header 'Content-Type: application/json' --data '{
    "model": "gpt-5.3-codex-spark",
    "input": [{"role": "user", "content": "Hello, what model are you?"}]
	}'
The article is a bit long, but the difficulty is not high if you follow the tutorial step by step. Be patient when configuring. The last chapter is simpler, teaching you how to configure OpenClaw using source code (not using the pre-configured Clawbot on Tencent Cloud), and selecting our own built account pool for model calls, so you won't have to worry about token costs anymore.
#BTCUSD #Eth #Clawdbot #token #aivideo #ChatGPT #BusinessGrowth #CryptoCommunity